Wednesday B: Data assimilation in 4D
Note that tutorial “Getting to know the variational application” is a prerequisite for this tutorial. In this tutorial we will learn about the ways to run four dimensional data assimilation variants. So far we have worked with 3DEnVar, which assumes that all the observations are valid at the center of the window and does not involve the forecast model. JEDI supports three kinds four dimensional cost functions, 4DEnVar, 4DVar and weak constraint 4DVar. Here we will explore the configuration for running 4DEnVar, 4DVar and the special case of the 4DVar cost function, often called 3DVar-FGAT.
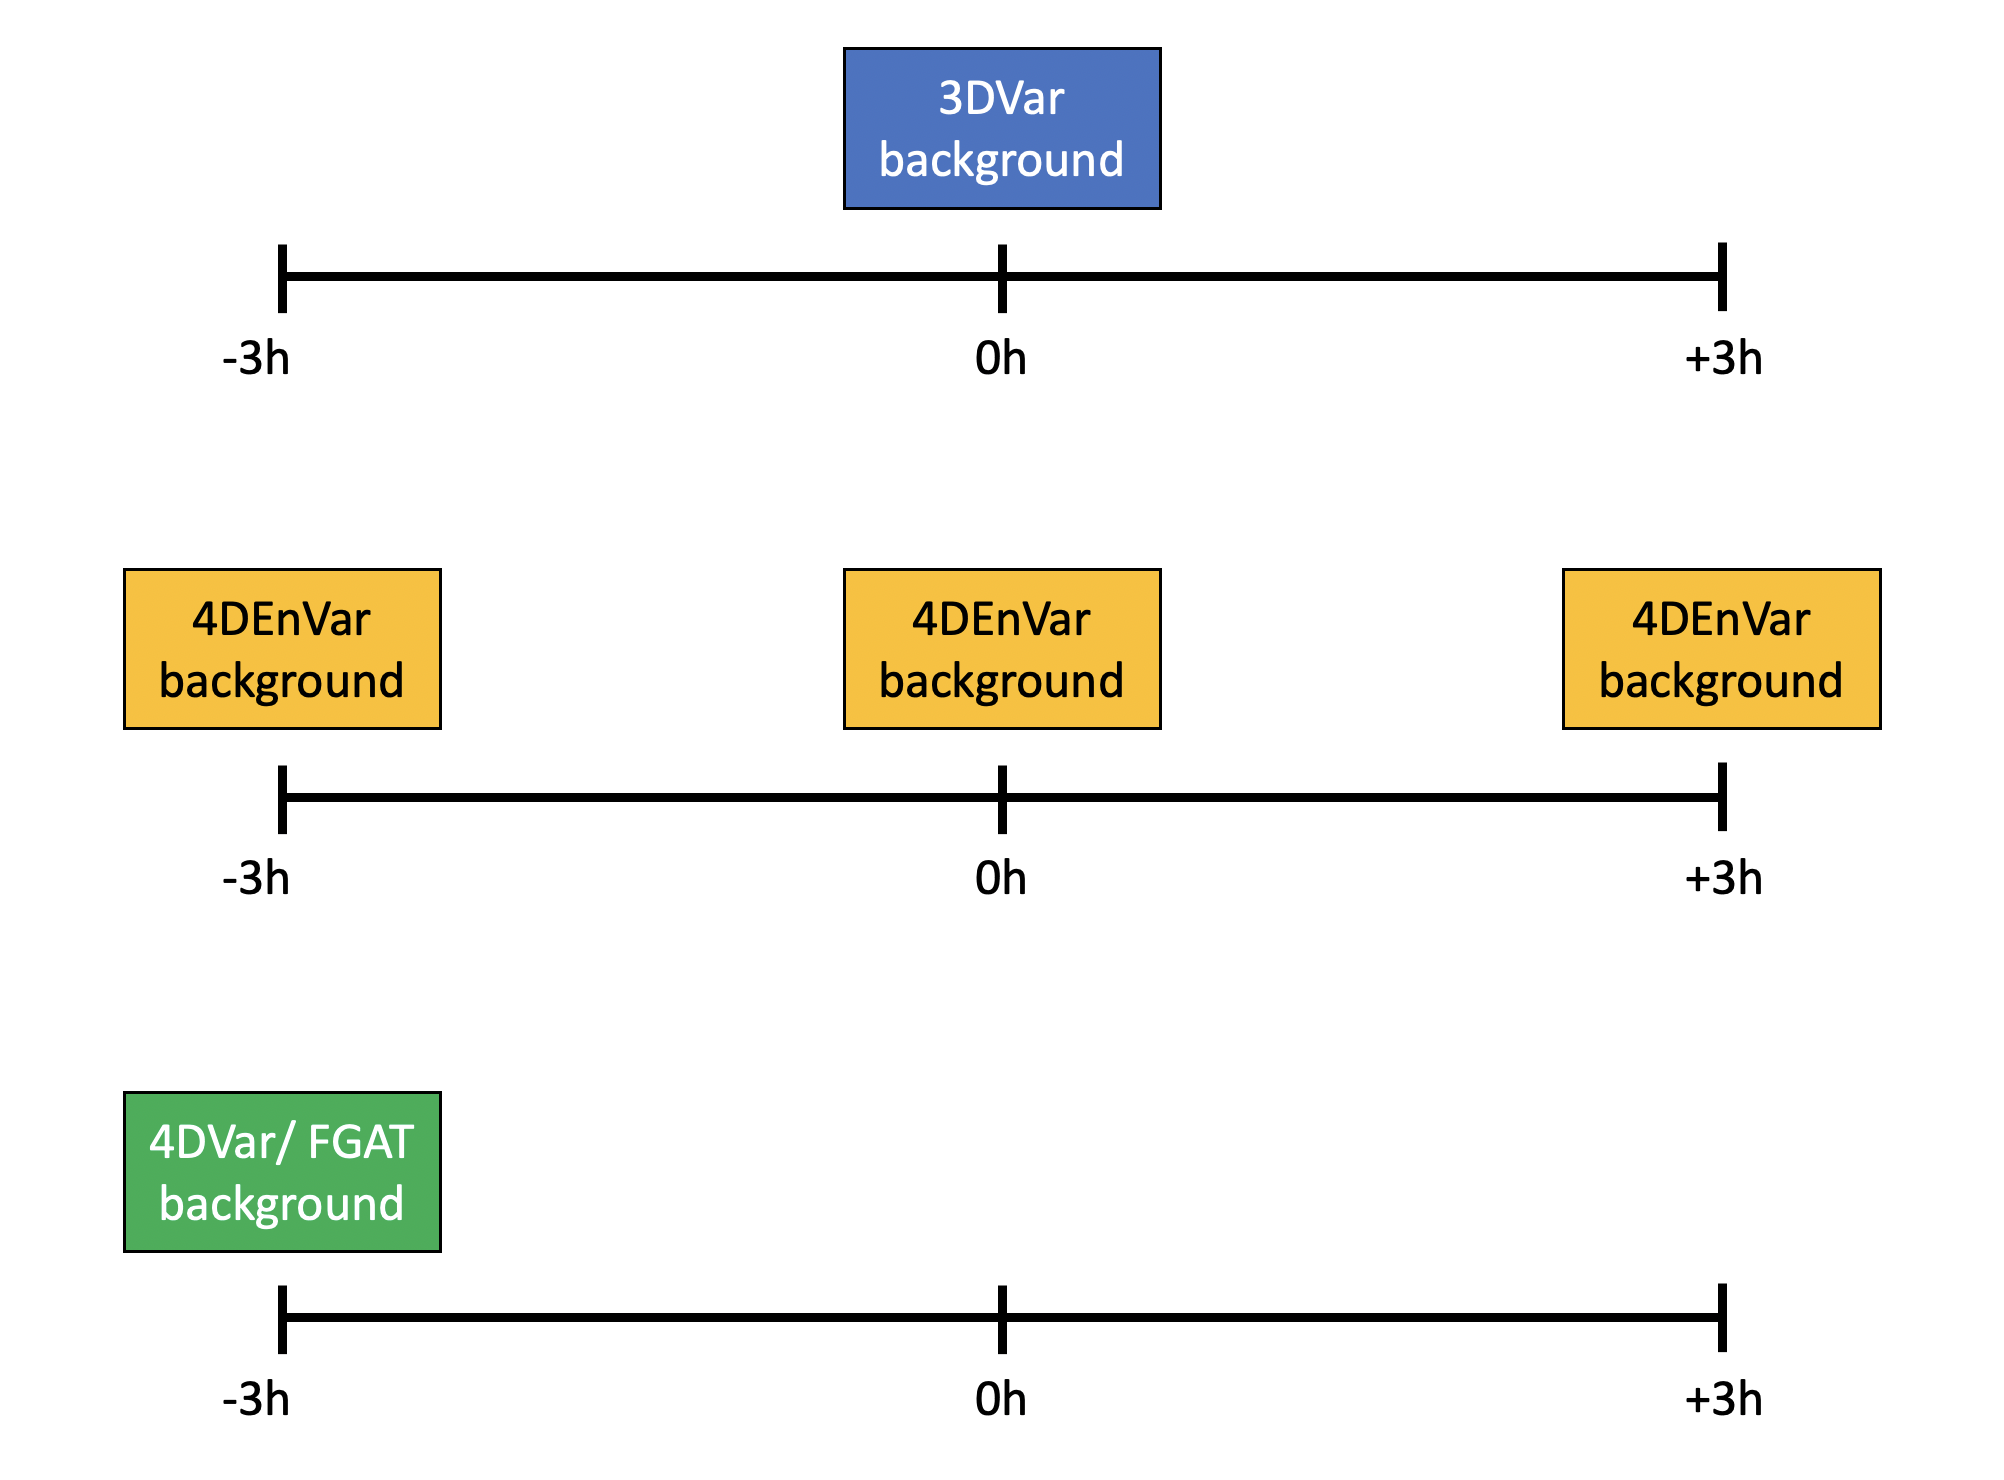
We will learn more about different data assimilation algorithms later in the week. For this tutorial the key thing to keep in mind is the position in the window for the background and ensemble. For 3DVar and its variants the background and ensemble are valid at the center of the window. For 4DEnVar the backgrounds and ensembles are valid for each sub-window of the assimilation. For 4DVar and FGAT the background and ensemble are valid at the beginning of the window. The configurations for these three types of cost function are outlined in the below figure, shown with a 6 hour window.
This practical is grouped into three steps:
Modify the 3DEnVar configuration to run 4DEnVar.
Modify the 3DEnVar configuration to run 3DEnVar-FGAT.
Modify the 3DEnVar configuration to run 4DVar.
Assess the assimilation runs.
Step 1: Revive your environment
Before anything can be run we need to revive the parts of the environment that are not preserved when the instance is stopped and restarted.
Begin by entering the container again:
cd ~/
singularity shell -e jedi-gnu-openmpi-dev_latest.sif
Your prompt should now look something like:
Singularity>
Once in the container be sure also to remove limits the stack memory to prevent spurious failures:
ulimit -s unlimited
ulimit -v unlimited
If you didn’t already do this, you need to install the FV3-JEDI-TOOLS package to provide the diagnostics:
cd ~/jedi
git clone https://github.com/jcsda-internal/fv3-jedi-tools
cd fv3-jedi-tools
/usr/local/miniconda3/bin/pip install --user -e .
Even if FV3-JEDI-TOOLS was installed previously the path still needs to be set in each session:
export PATH=$HOME/.local/bin:$PATH
Set the path to the JEDI build directory
JEDIBUILD=~/jedi/build/
Step 2: Run a 4DEnVar
Warning
The following exercises will involve modifying Yaml files. It is important to keep in mind that Yaml files are sensitive to indentation and it uses indentation to decide which parts to read. When copying chunks of code from here into the Yaml files make sure to preserve the existing indenation. Do not use tabs, all indentation must be spaces.
The first exercise is to convert the yaml to run a 4DEnVar instead of 3DEnVar. By looking in the
Data/bkg directory you can see that backgrounds are available every hour throughout the
window. This would allow for hourly sub-windows of 4DEnVar. However, for 4DEnVar it is also necessary
to have the ensemble available for every sub-window. Looking in e.g. Data/ens/mem001/ you can
see that the ensemble is available only every three hours. So in this exercise we will create a
4DEnVar with three sub-windows.
Begin by creating a copy of the 3denvar.yaml configuration file, that will be where we start from:
cd ~/jedi/tutorials/20201001_0000z
cp Config/3denvar_backup.yaml Config/4denvar.yaml
Now we need to modify the cost function, background and ensemble parts of the configuration to
enable 4DEnVar. Start by opening Config/4denvar.yaml ready to edit it.
The cost function type is selected by the line:
cost function:
  cost type: 3D-Var
This should be changed to the cost function needed for 4DEnVar and to describe the sub-windows that are needed:
cost function:
  cost type: 4D-Ens-Var
  subwindow: PT3H
Leave the other parts of the configuration, such as the window information, as they are for 3DEnVar. Note that we are using sub-windows of three hours but we are using three sub-windows in a 6 hour assimilation window. Each background is centered on a sub-window so the first sub-window extends from 2020-09-30T21:00:00 to 2020-09-30T22:30:00, the middle sub-window from 2020-09-21T22:30:00 to 2020-10-01T01:30:00 and the final sub-window from 2020-10-01T01:30:00 to 2020-10-01T03:00:00. Only the central sub-window will include observations across a three hour range. The edge sub-windows are trimmed to one and a half hours by the length of the assimilation window.
The background part of the configuration lives within the cost function: section and is
given by:
background:
  filetype: geos
  datapath: Data/bkg
  filename_bkgd: geos.bkg.20201001_000000z.nc4
  filename_crtm: geos.crtmsrf.c24.nc4
  psinfile: true
  state variables: [ua,va,t,ps,q,qi,ql,o3ppmv,phis,frocean,frlake,
                    frseaice,vtype,stype,vfrac,sheleg,ts,soilt,soilm,u10m,v10m]
In Jedi configuration files when there needs to be multiple states we typically use the
states keyword and then provide the list of states. In Yaml lists are provided using dashes.
For the 3-hourly backgrounds that we intend to use, the configuration needs to be changed to:
background:
  states:
  - filetype: geos
    datapath: Data/bkg
    filename_bkgd: geos.bkg.20200930_210000z.nc4
    filename_crtm: geos.crtmsrf.c24.nc4
    psinfile: true
    state variables: [ua,va,t,ps,q,qi,ql,o3ppmv,phis,frocean,frlake,
                      frseaice,vtype,stype,vfrac,sheleg,ts,soilt,soilm,u10m,v10m]
  - filetype: geos
    datapath: Data/bkg
    filename_bkgd: geos.bkg.20201001_000000z.nc4
    filename_crtm: geos.crtmsrf.c24.nc4
    psinfile: true
    state variables: [ua,va,t,ps,q,qi,ql,o3ppmv,phis,frocean,frlake,
                      frseaice,vtype,stype,vfrac,sheleg,ts,soilt,soilm,u10m,v10m]
  - filetype: geos
    datapath: Data/bkg
    filename_bkgd: geos.bkg.20201001_030000z.nc4
    filename_crtm: geos.crtmsrf.c24.nc4
    psinfile: true
    state variables: [ua,va,t,ps,q,qi,ql,o3ppmv,phis,frocean,frlake,
                      frseaice,vtype,stype,vfrac,sheleg,ts,soilt,soilm,u10m,v10m]
Now there is a list of states, one for the middle of each of the sub-windows.
Now we need to provide lists of states for the ensembles. The ensemble part of the configuration (for the first two members) looks like
members:
  - filetype: geos
    state variables: *anvars
    datapath: Data/ens/mem001
    filename_bkgd: geos.ens.20201001_000000z.nc4
    psinfile: true
  - filetype: geos
    state variables: *anvars
    datapath: Data/ens/mem002
    filename_bkgd: geos.ens.20201001_000000z.nc4
    psinfile: true
For 4DEnVar with the three sub-windows this would be:
members:
- states:
  - filetype: geos
    state variables: *anvars
    datapath: Data/ens/mem001
    filename_bkgd: geos.ens.20200930_210000z.nc4
    psinfile: true
  - filetype: geos
    state variables: *anvars
    datapath: Data/ens/mem001
    filename_bkgd: geos.ens.20201001_000000z.nc4
    psinfile: true
  - filetype: geos
    state variables: *anvars
    datapath: Data/ens/mem001
    filename_bkgd: geos.ens.20201001_030000z.nc4
    psinfile: true
- states:
  - filetype: geos
    state variables: *anvars
    datapath: Data/ens/mem002
    filename_bkgd: geos.ens.20200930_210000z.nc4
    psinfile: true
  - filetype: geos
    state variables: *anvars
    datapath: Data/ens/mem002
    filename_bkgd: geos.ens.20201001_000000z.nc4
    psinfile: true
  - filetype: geos
    state variables: *anvars
    datapath: Data/ens/mem002
    filename_bkgd: geos.ens.20201001_030000z.nc4
    psinfile: true
This needs to be done for all ensemble members. You may wish to use 10 members instead of 32 if you get bored making these changes!
The localization part of the configuration contains the timeslots keyword. Here we need to
provide a list of the times of the middle of the sub-windows. Note that yaml can accept lists in
square brackets as well as using dashes. The new timeslots are provided as:
timeslots: ['2020-09-30T21:00:00Z','2020-10-01T00:00:00Z','2020-10-01T03:00:00Z']
If you search on ‘3denvar’ in the configuration you’ll see that it is used in naming the hofx and analysis output. You may want to change these instances to ‘4denvar’ to preserve previous output.
Now you are ready to run the 4DEnVar data assimilation but before doing that note that for 4DEnVar each sub-window runs in parallel and since there are three sub-windows we need three times as many processors as previously, in this case 18. So to run 4DEnVar issue:
mpirun -np 18 $JEDIBUILD/bin/fv3jedi_var.x Config/4denvar.yaml Logs/4denvar.log
Note that the 4DEnVar run can be a bit sluggish due to the MPI oversubscription (these AWS nodes only have 8 physical cores). You may want to start working on the next step while it runs.
Step 3: Run a 3DEnVar-FGAT
Now we will run a 3DEnVar-FGAT. FGAT stands for First Guess at Appropriate Time. Essentially this type of data assimilation is an amalgam of 3DVar and 4DVar. Like 4DVar it uses the model forecast to assess \(h(x)\) at the correct time and does not assume that observations all lie at the middle of the window. Like 3DVar it does not involve the forecast model adjoint in the minimization.
Again begin by creating a copy of the 3denvar.yaml configuration file:
cp Config/3denvar_backup.yaml Config/3denvar-fgat.yaml
Since FGAT is a simplification of 4DVar (the adjoint model is just replaced with the identity model) the cost function for FGAT is the same as for 4DVar:
cost function:
  cost type: 4D-Var
From the above figure you can see that the only information that needs to be read in is at the
beginning of the window. Anything needed throughout the window is handled internally by running a
forecast of the model through the window. In a few places the date needs to be updated compared to
the 3denvar.yaml configuration.
Change to
filename_bkgd: geos.bkg.20200930_210000z.nc4in thebackgroundpart of the configuration.Change to
filename_bkgd: geos.ens.20200930_210000z.nc4for each ensemble member.Change timeslots to
timeslots: ['2020-09-30T21:00:00Z']in thelocalizationpart of the configuration.Change date to
date: '2020-09-30T21:00:00Z'in thebackground errorpart of the configuration.
Since 3DEnVar-FGAT requires the forecast model, information about the model setup needs to be
provided. This is included in the configuration inside the cost function part:
cost function:

  ...

  model:
    name: FV3LM
    nml_file: Data/fv3files/input_geos_c24.nml
    trc_file: Data/fv3files/field_table
    nml_file_pert: Data/fv3files/inputpert_4dvar.nml
    lm_do_dyn: 1
    lm_do_trb: 0
    lm_do_mst: 0
    tstep: PT1H
    model variables: [u,v,ua,va,t,delp,q,qi,ql,o3ppmv,phis,frocean,frlake,
                      frseaice,vtype,stype,vfrac,sheleg,ts,soilt,soilm,u10m,v10m]
This model, which is called FV3LM in the system, is the standalone dynamical core. There is
no physics being run in this case but this is OK for testing purposes at low resolution.
Note that the model requires some variables not previously in the background, namely the addition of
u and v and delp instead of ps. The background variables should be made to be the same as the model
variables so the configuration looks like:
background:
  filetype: geos
  datapath: Data/bkg
  filename_bkgd: geos.bkg.20200930_210000z.nc4
  filename_crtm: geos.crtmsrf.c24.nc4
  psinfile: true
  state variables: [u,v,ua,va,t,delp,q,qi,ql,o3ppmv,phis,frocean,frlake,
                    frseaice,vtype,stype,vfrac,sheleg,ts,soilt,soilm,u10m,v10m]
The 4DVar cost function in JEDI requires a linear model. For FGAT this is simply the identity linear model but this still needs to be provided in the configuration. It should be added in the inner loop part of the configuration as follows:
iterations:

- ninner: 10

  linear model:
    variable change: Identity
    name: FV3JEDIIdTLM
    tstep: PT1H
    tlm variables: *anvars

  ...
As with 4DEnVar, it’s worth changing instances of 3denvar in the configuration to
e.g. 3denvar-fgat so that output of \(h(x)\) and the analysis is not overwritten.
Now you should be ready to run the 3DEnVar-FGAT data assimilation:
mpirun -np 6 $JEDIBUILD/bin/fv3jedi_var.x Config/3denvar-fgat.yaml Logs/3denvar-fgat.log
Step 4: Run a 4DVar
Evolving from the 3DEnVar-FGAT to 4DVar is very simple since the cost function and arrangement of the backgrounds and ensemble is unchanged. The only difference compared to 3DEnVar-FGAT is the linear model, which should now be the actual model adjoint.
Instead of starting from the 3DEnVar configuration file just start from the 3DEnVar-FGAT configuration file:
cp Config/3denvar-fgat.yaml Config/4dvar.yaml
Now replace the identity linear model:
linear model:
  variable change: Identity
  name: FV3JEDIIdTLM
  tstep: PT1H
  tlm variables: *anvars
with the actual FV3 linear model:
linear model:
  variable change: Analysis2Model
  name: FV3JEDITLM
  nml_file: Data/fv3files/input_geos_c24.nml
  trc_file: Data/fv3files/field_table
  nml_file_pert: Data/fv3files/inputpert_4dvar.nml
  tstep: PT1H
  tlm variables: [u,v,t,delp,q,qi,ql,o3ppmv]
  lm_do_dyn: 1
  lm_do_trb: 0
  lm_do_mst: 0
Also use 4dvar in the the output analysis and \(h(x)\) files so as not to overwrite
the previous output.
Now you are ready to run a 4DVar analysis:
mpirun -np 6 $JEDIBUILD/bin/fv3jedi_var.x Config/4dvar.yaml Logs/4dvar.log
Note that 4DVar can take some time to run so feel free to explore the next steps while it completes.
Step 5: Apply the diagnostic tools
Now that you have run these different kinds of assimilation you can apply all the tools to assess
the health of the assimilation runs learnt earlier in the week. Try looking at some the statistics
of the outputs and comparing the increments between assimilation runs. Can you try adding outer
loops to the various systems and adjusting the number of inner loops? Keep in mind that for 4DVar
and FGAT the analysis is valid at the beginning of the window rather than the middle. The diagnostic
configuration files need to be modified for this. You will also need to modify both the background
and analysis in Config/create_increment_3denvar.yaml each time you want to create the
increment from the analysis.